

TABLE OF CONTENTS
Let’s talk about one of the most important, and often intimidating, principles in bread baking: hydration.
I know it sounds like we’re about to dive into a chemistry lesson, but it’s very straightforward.
Hydration is the percentage of water in your dough relative to flour. It plays a significant role in fermentation and the overall quality of your final loaf by influencing your crumb structure, dough strength, and crust texture.
Once you understand how it works, you can start adjusting your recipe based on what you’re seeing. Was your last recipe too hard to handle despite folds every hour? Reduce the hydration. Was your crumb too tight and dense? Increase it.
I’m going to break down what hydration really means and why it matters.
How to Calculate Hydration
To determine hydration, simply divide the weight of water in your dough by the weight of flour, and multiply by 100.
Example:
- 500g flour
- 350g water
- Hydration = (350 ÷ 500) x 100 = 70%
Most sourdough recipes already list flour and water by weight, so you can usually see the hydration at a glance. Once you know the number, you can start adjusting and observing how it changes your dough, crumb, and crust.
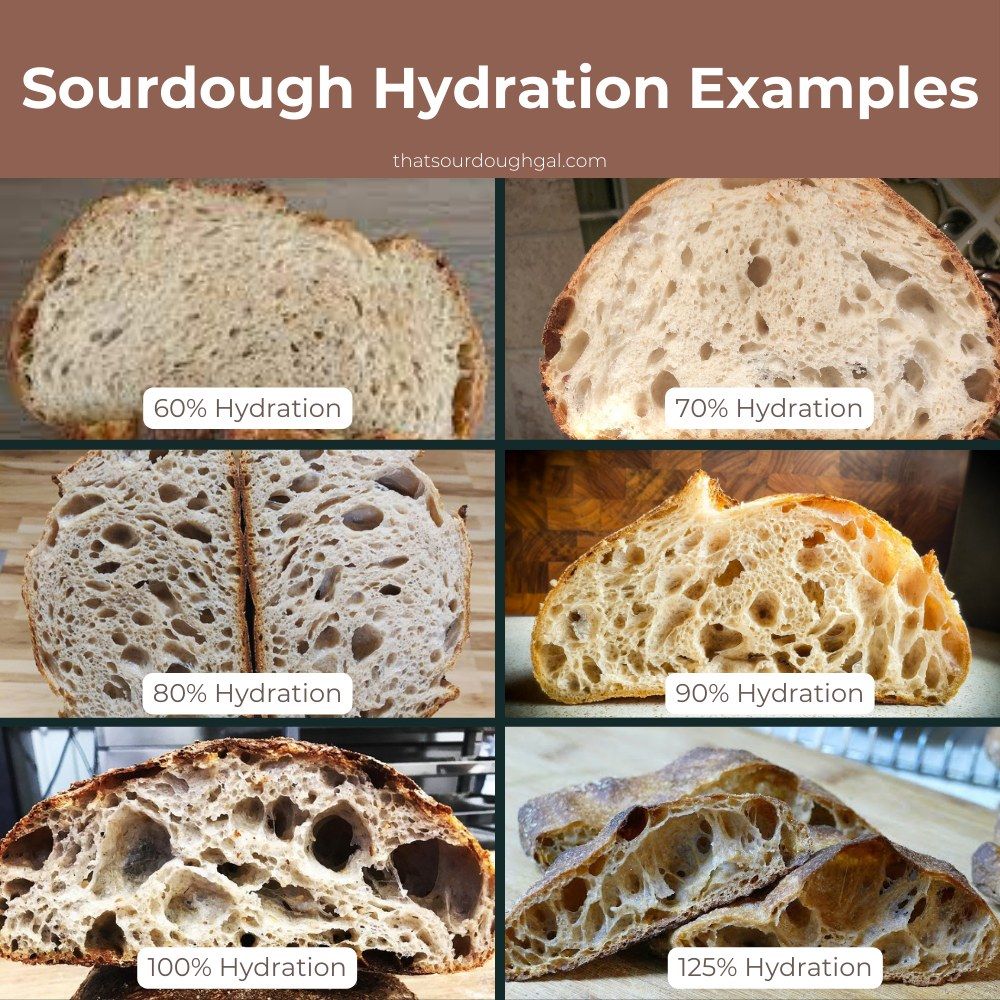
Hydration Levels
Here’s a basic overview of the different hydration levels and their effects:
| Hydration | Difficulty | Elasticity | Crumb | Crust |
|---|---|---|---|---|
| 60–65% | Easy | Resists stretching | Tight, dense | Firm, dry, no blisters |
| 70–75% | Moderate | Not hard to stretch, but still firm | Medium-sized holes, softer texture | Thin, crisp, slight blistering |
| 80% | Advanced | Very stretchy, slack | Open, airy, soft | Crackly, delicate, plenty of blisters |
Many home bakers—myself included—find the sweet spot to be around 70–75%. But if you’re struggling to get a good loaf at that level, try starting lower (e.g., around 65%) and work your way up.
Now let’s get into why hydration makes such a difference, and how each variable plays a role.
Dough Elasticity
Elasticity is how much your dough can stretch. You want a dough that’s loose enough to handle, but strong enough to hold its structure once we’re ready to shape and bake.
Water activates gluten formation, but higher hydration softens that structure. The more water, the looser the dough; and the more help it’ll need during bulk fermentation to build its strength.
Here’s a general breakdown:
| Hydration | Kneading & Handling |
|---|---|
| 60–65% | Minimal kneading and stretching; dough is strong and stiff |
| 70–75% | Moderate kneading and stretching; holds shape well with proper development |
| 80%+ | Dough is very loose; requires frequent stretching and more advanced handling |
Crumb Structure
Water isn’t just essential for gluten development. It also affects gas formation, which determines your loaf’s crumb. “Crumb” refers to the texture inside the loaf: Are the holes small and tight, or large and web-like?
Higher hydration makes it easier for gas (carbon dioxide from fermentation) to stretch the gluten network. This creates the different crumb patterns.
| Hydration | Crumb Structure |
|---|---|
| 60–65% | Dense but sturdy, like classic sandwich bread |
| 70–75% | Air pockets form more easily; crumb is more open but controlled |
| 80%+ | Very open and irregular; lacy, web-like structure |
Crust
Last but certainly not least, hydration affects the texture and appearance of the crust. More water in the dough means more steam during baking, which changes how the crust forms in the oven.
| Hydration | Crust Characteristics |
|---|---|
| 60–65% | Thick, firm crust; can feel dry if overbaked |
| 70–75% | Thin, crisp shell with some blistering |
| 80%+ | Delicate, crackly crust with plenty of blistering |
What Hydration is Best?
By now, it’s easy to see why many experts recommend starting at 65% hydration. The dough doesn’t need as much hands-on development, which takes time and practice to get comfortable with. Shaping is also more forgiving since the dough holds its form without much finesse.
Crumb and crust are more aesthetic aspects of bread, but as you gain experience, you’ll start to enjoy experimenting with them and understanding how to adapt them to your liking.
Personally, I started around 70% and worked my way up—almost all my loaves now land somewhere around 78%. My dough typically requires 4–5 sets of folds throughout bulk fermentation, but the crumb and crust are the perfect balance of soft and crunchy, open and sturdy.
If you’re curious to try 80% hydration or higher, here are a few tips:
- Whole wheat, rye, spelt, and other whole grain flours absorb water more easily than white flour. Use a mix to help manage higher hydration.
- If the dough feels sticky and difficult to handle, wet your hands with a little bit of water.
- Use a bench scraper to help move and shape the dough.
- Try an autolyse—a short rest of 30–60 minutes for your flour and water after they’re mixed, before adding starter and salt.
- Knead the dough well during your initial mix, and complete your first set of folds after 30 minutes.
These techniques are especially helpful with higher hydration:
Final Thoughts
If hydration still feels confusing, don’t worry! Just start small and build confidence. When I first started baking sourdough bread, it was my “goal” to reach 80% hydration because I thought that was the golden standard.
And while some might argue higher hydration is superior, you can certainly still bake great bread at low and moderate levels. Hydration is less about “hitting” a specific number and more about understanding the hows and whys of your dough’s behaviour.
What’s your go-to hydration level? What was your experience with higher hydration recipes? I’d love to hear from you in the comments.
See you soon,


Leave a comment